PassHub for Business
Self-Hosted PassHub
PassHub is an open-source project with the code available on GitHub. See https://github.com/wwpass/passhub for the backend and https://github.com/wwpass/passhub-frontend-v2 for the frontend.
You can deploy an instance of PassHub on your company servers, either hardware server, located in a data center or a Virtual Private Server (VPS). This way you have full control of your data.
Follow the installation instructions for Ubuntu servers. The PassHub architecture can fit the service on a single host or on three hosts with a replicated database and a few web servers. It is possible to bind the PassHub to the company's Active Directory for uniform user rights control. Alternatively, you may use the built-in user control feature of PassHub for Business, see below.
PassHub as a Service
An easier way to get the PassHub instance and control user access to you company data is to subscribe to PassHub as a service. We deploy a PassHub server with a URL yourcompany.passhub.us in the US, or yourcompany.passhub.us in the EU. To start, please provide the email of the first user who will be assigned an administrator role.
PassHub user management
As an administrator, sign in to PassHub. See https://passhub.net/doc/ for details.
Scan the QR code on your PassHub site with WWPass Key. During this first sign-in, you will be asked to confirm your email. When your account is created, you are automatically assigned the site administrator role. Same as other users, you can create your own records, safes, and share them with your colleagues. Being a site administrator, you can also add PassHub users, change their access rights, and revoke or temporarily disable user access.
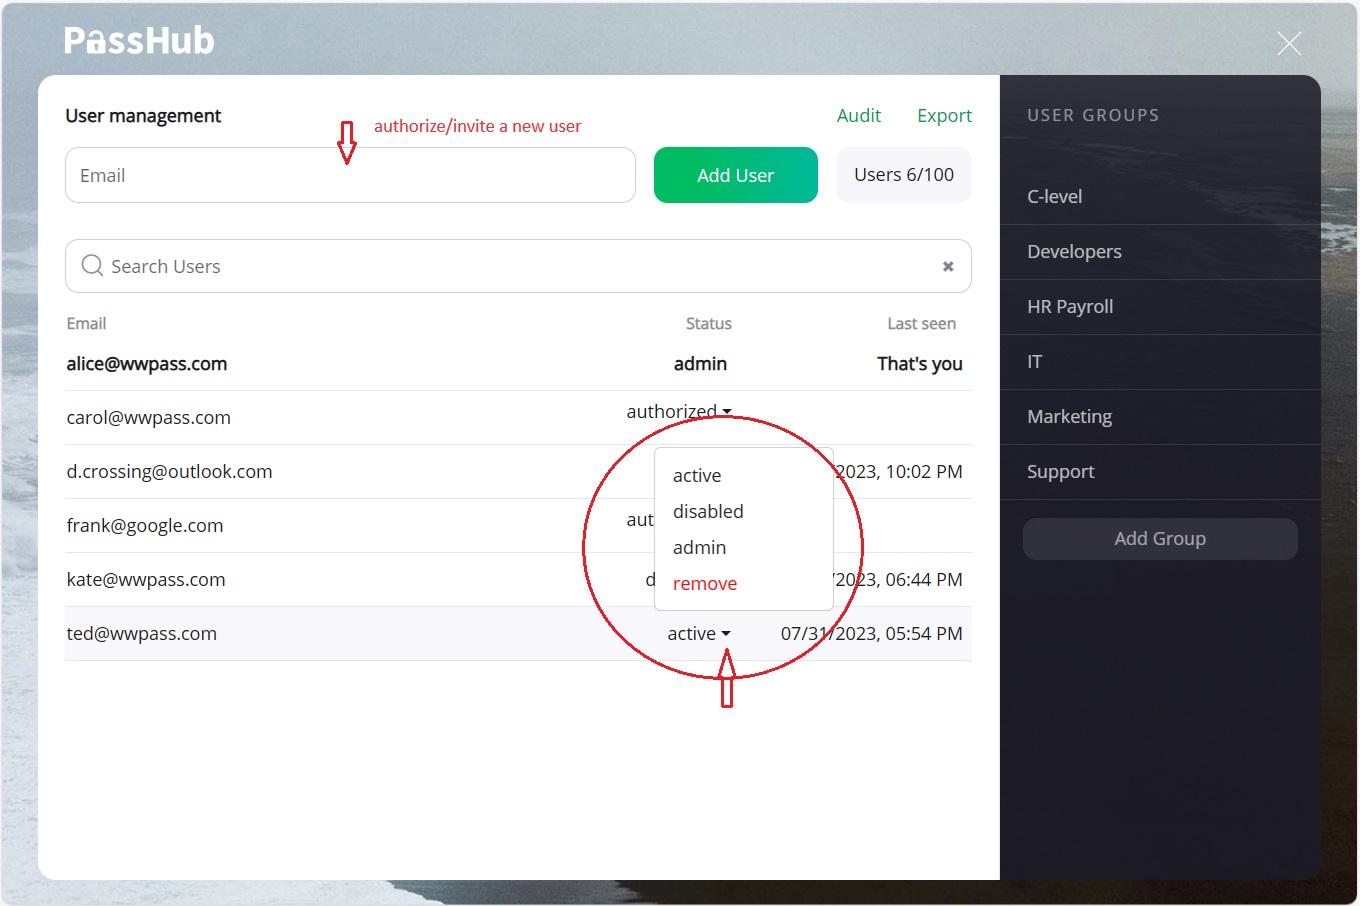
To get to the user management page, click the "Account" icon in the upper right corner of PassHub page and select the "Users" item with the wrench icon.

On the user management page, you can invite/authorize a new user to create an account with their email address.
Use the "status" column to control the user status:
- Admin: Site administrator
- Disabled: Temporarily revoke user access
- Active: Normal user
You can also delete user accounts, but this is a one-way operation: any unshared user data will be completely lost. The disable operation is safe and reversible.
User groups
Groups represent a widely used technique to provide access rights to users depending on their department, role, etc. in an organization. PassHub allows site admins to create user groups, add users to groups, and define a list of safes along with access rights to particular safes ("edit" or "view-only").
Only site administrators are allowed to access Group management controls. Here is how it's done:
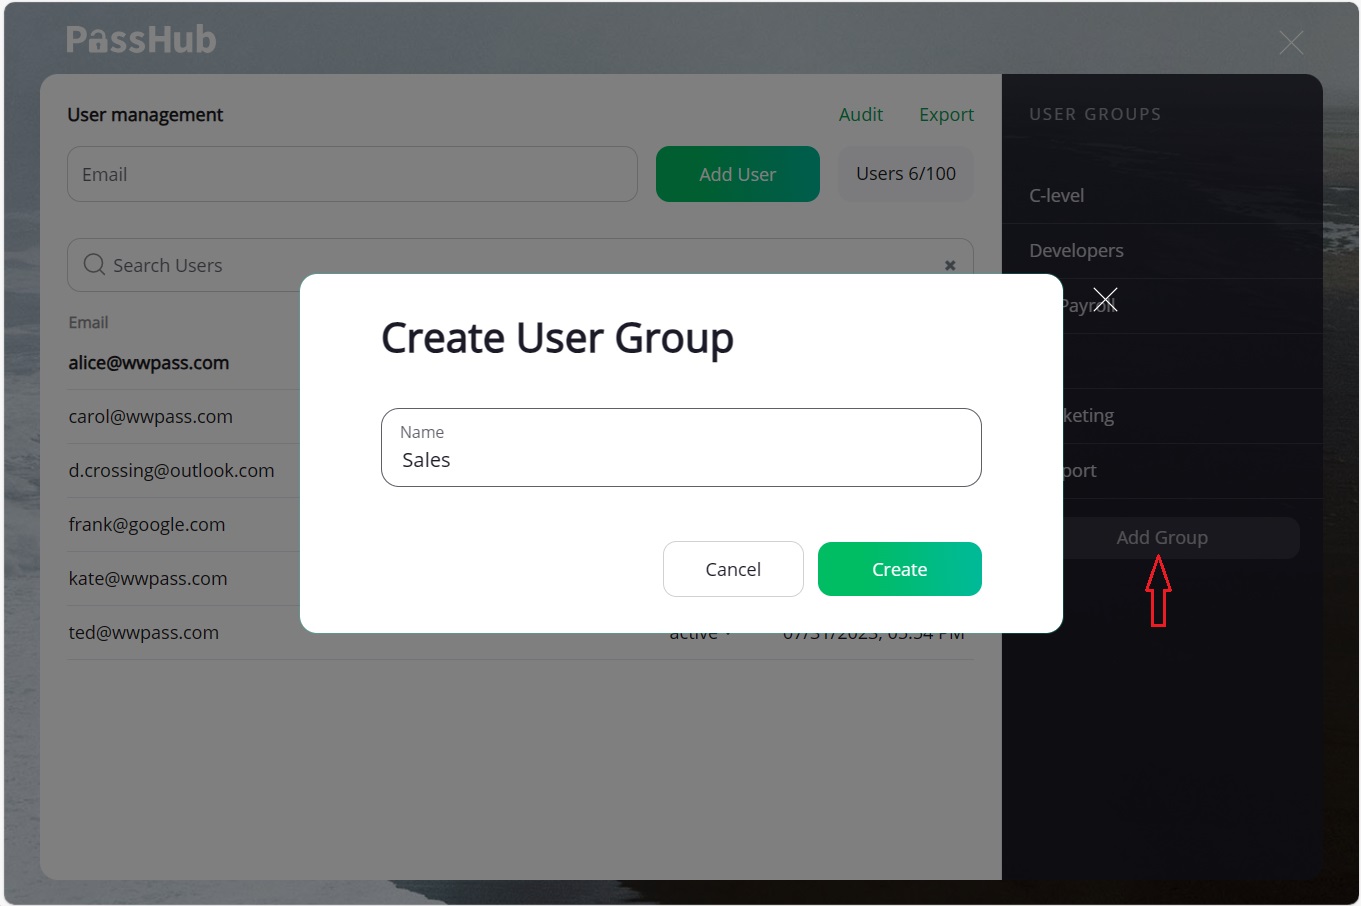
Step 1. Create a new group
On the "User page", click the "Add Group" button in the "User Groups" pane. Select a unique name for the group.
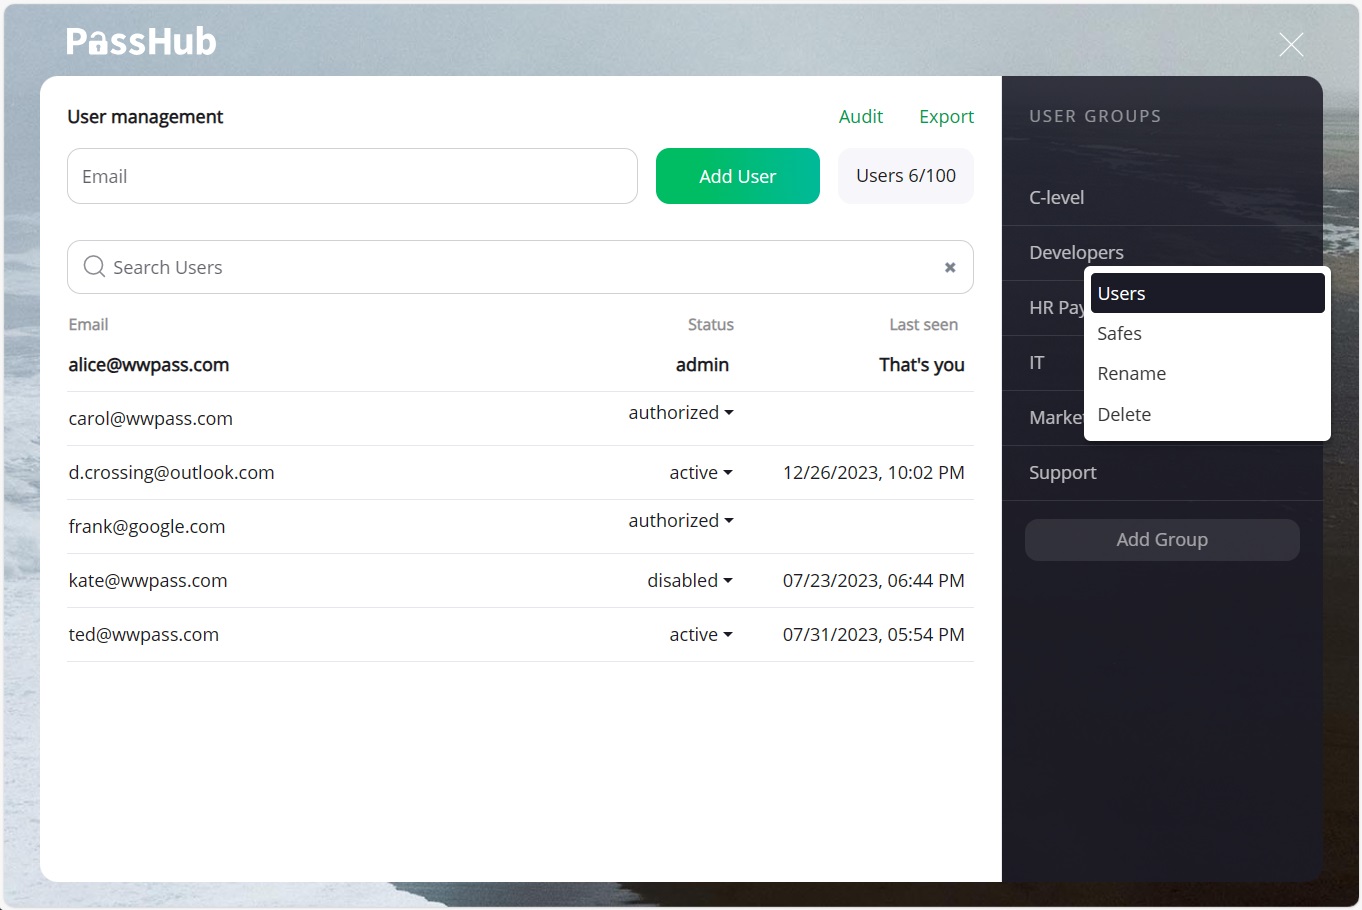
Step 2. Add users to the group
Click on a group record and choose "Users" in the group menu.
"Select user to add" shows a list of users you can include in the group.
Note: invited (authorized) users are not listed if they have not created a PassHub account yet (i.e., are not in an active, admin, etc. state).
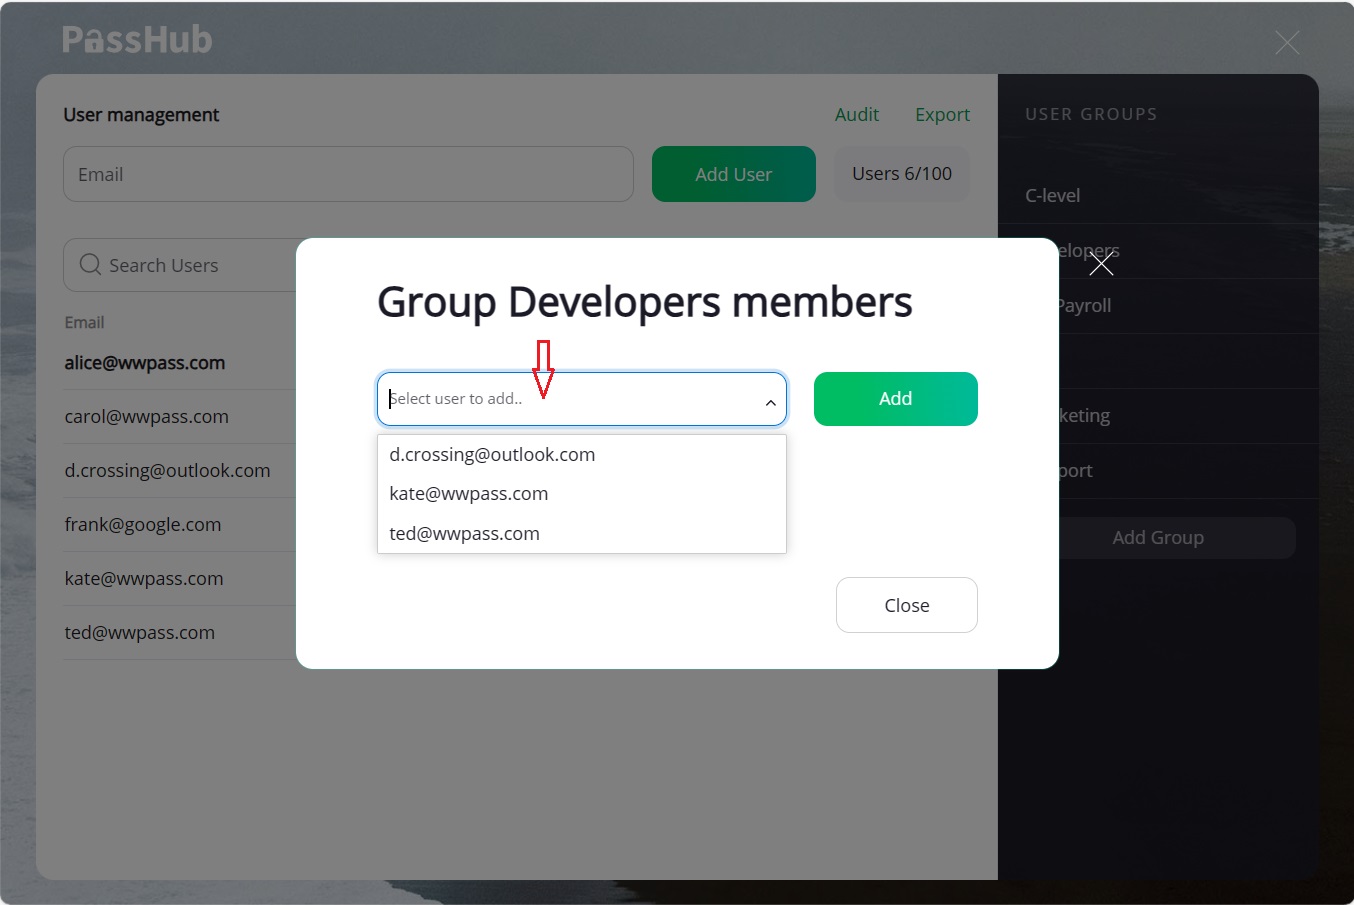
The "Add" button puts the selected user into the group list. Later, you can remove any user by clicking the "X" icon in the corresponding line. You, being a site admin and the creator of the group, are also a member of the group.
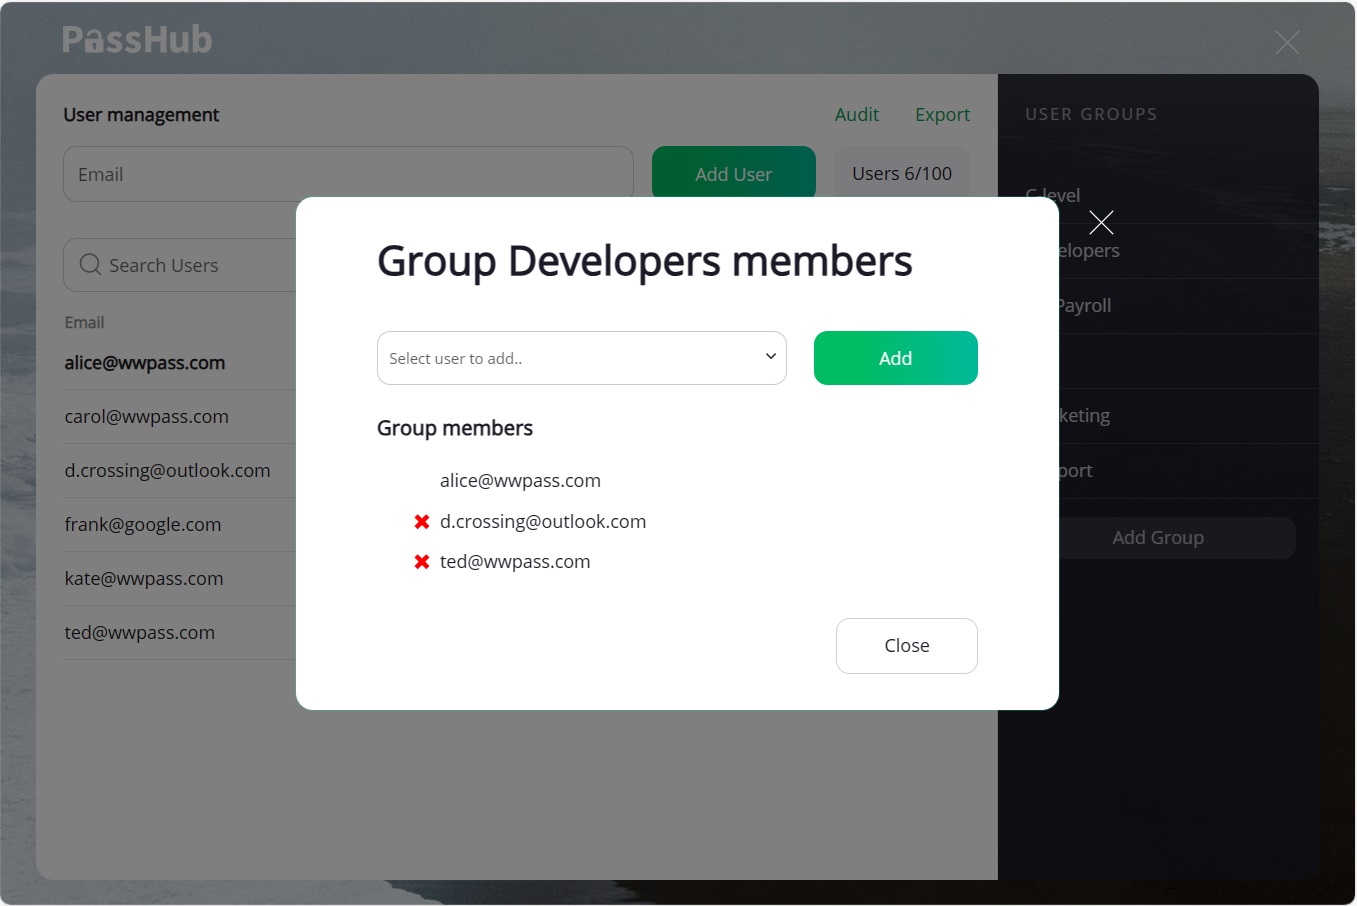
Use the red cross icon to the left of the user email to remove a particular user from the list.
Step 3. Add safes to the group
The "Safes" item of the group menu opens a dialog to control the safe list of the group. As a site admin, you can only add safes that you created or for which you have "owner" rights to. For each safe, you can set group access rights: "Can Edit", "Can view", or "Limited view".
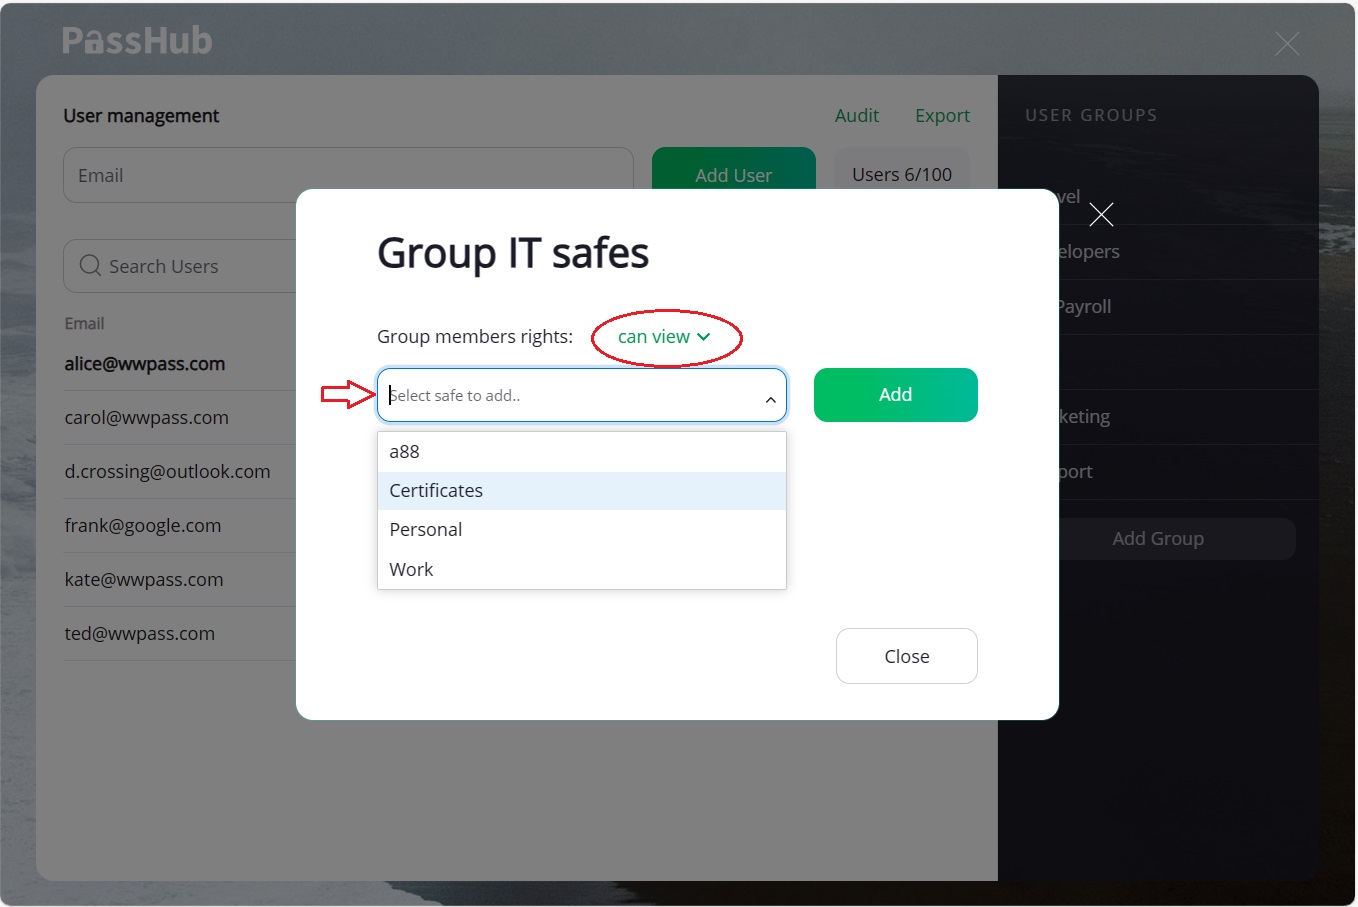
Later on, you can change the access rights or remove a safe from the group list.

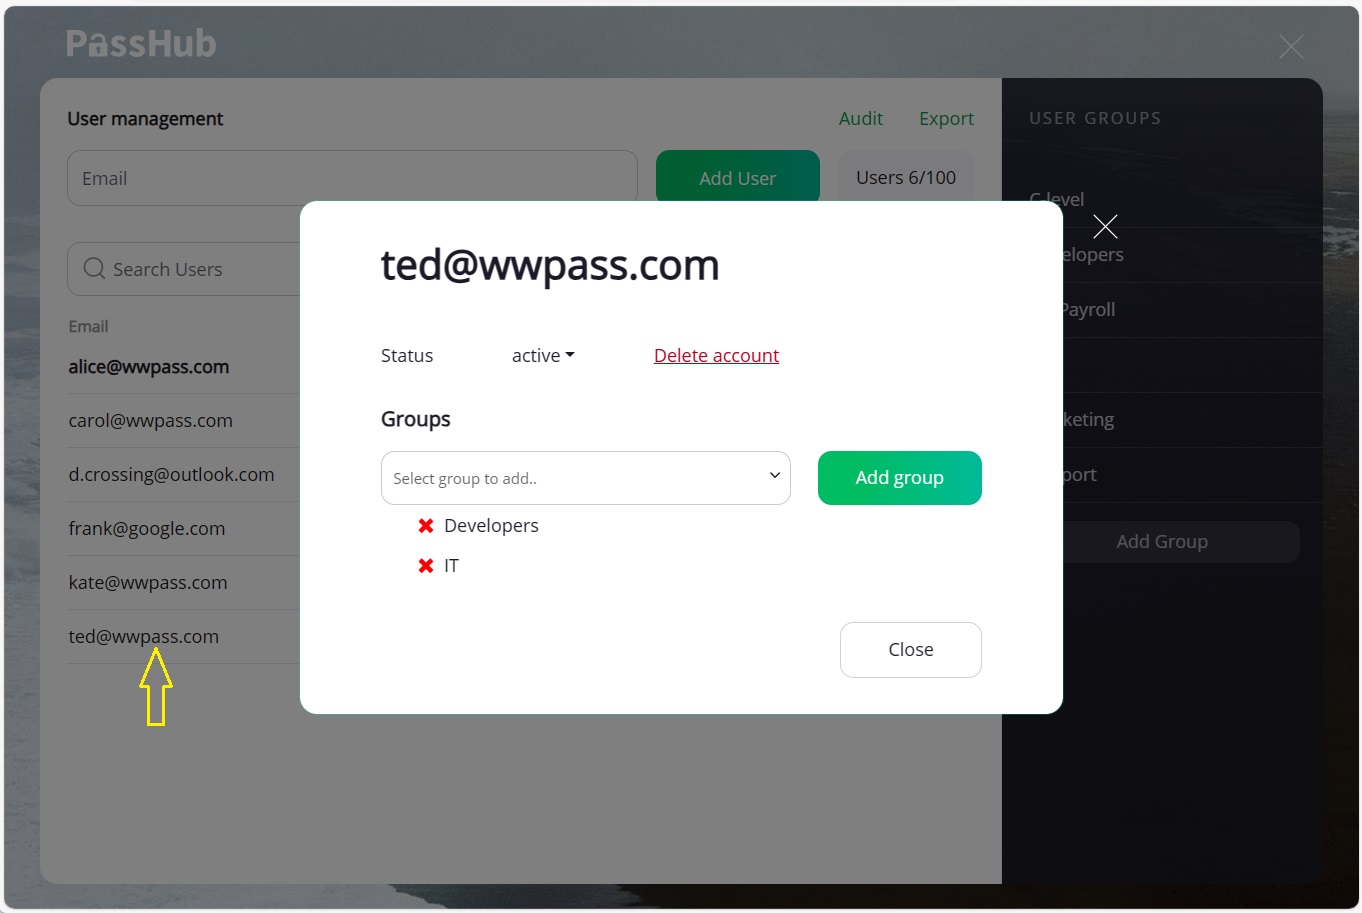
You can view and control group membership of a particular user by clicking the user email on the left pane:
Connect PassHub to Active Directory (LDAP, Azure)
PassHub for Business can sync its users to a company Active Directory (AD).
The first time a user logs in to PassHub (at the time a user account is created), the user provides their AD credentials (the user principal name (UPN) and a password). These credentials are checked by AD, and the user account is bound to the AD records.
To identify a user for safe sharing or PassHub safe group membership, PassHub relies on a user mail provided by the AD. In the absence of the user email address, PassHub uses the UPN.
Every time a user logs in to PassHub, the user's membership in a specific AD group of "PassHub users" is checked. Another AD group, "PassHub admins," gives its members admin rights for PassHub.
When PassHub is connected to Active Directory, user rights (active, admin, or disabled) are defined by AD group membership. To prevent conflicts, the corresponding elements in the PassHub "User Management Page" are only used to indicate user state, not to control it.
There is an almost one-to-one mapping of user rights in standalone PassHub and PassHub AD:
Authorized - the user is a member of the "PassHub users" group but has not created a PassHub account yet.
Active - a member of the "PassHub users" group with a PassHub account.
Admin - same as active, plus a member of "PassHub admin".
Disabled - The user has a PassHub account but their "PassHub user" group membership was revoked.
Passhub User Management
There are 2 methods to do this:
-
Microsoft Graph API
-
Lightweight Directory Access Protocol (LDAPS for Azure)
We suggest following through with the Graph API as it is easier however both options are available:
Creating Groups
You must create 2 groups for Passhub, a User Group and an Admin Group, If you know how to do this you can skip this step.
Go to "Entra ID", then under "Manage" go to "Groups", finally click "New Group", put in a name e.g. "PasshubUsers" and leave the rest default, finally click create.
Repeat this step for the Admin group as well.
Note: Save the names of both groups for the config file.
- Lightweight Directory Access Protocol (LDAPs)
We suggest following through with the Graph API as it is easier however both options are available:
Passhub User Management with Azure
You can deploy Passhub for Business to Azure through the Microsoft Graph API.
1. Register the Application through Azure
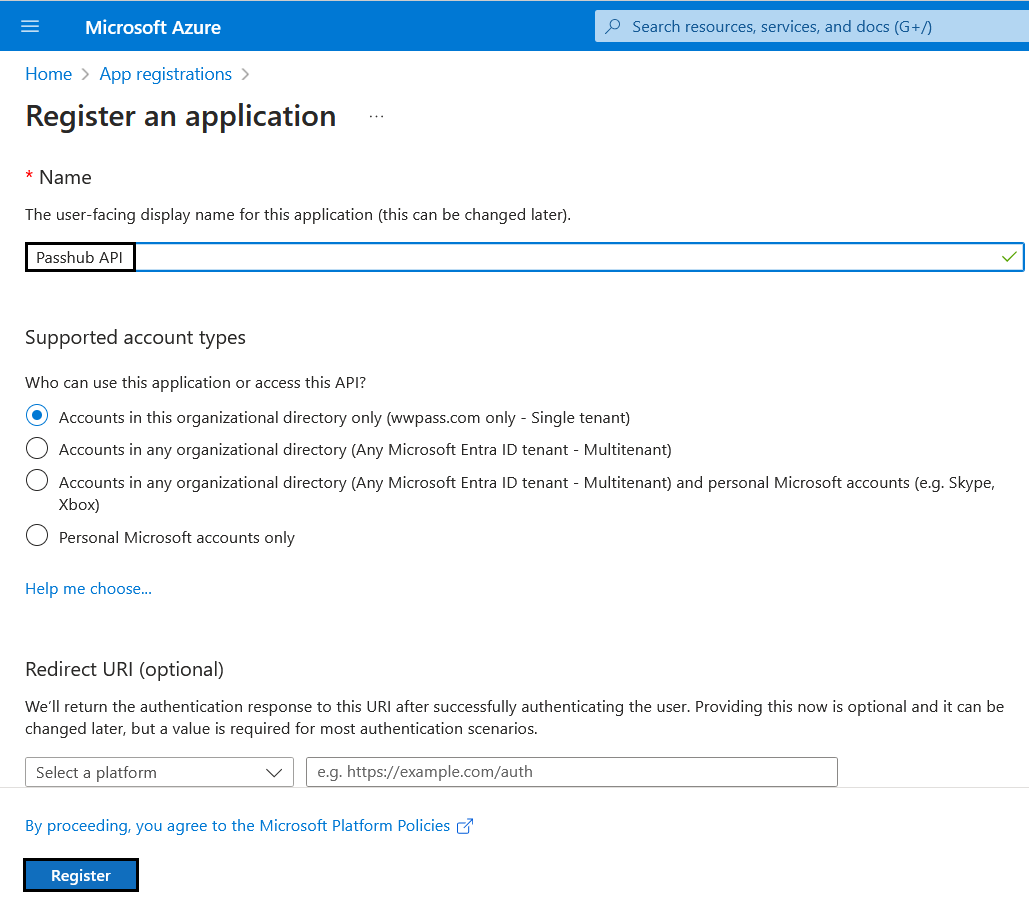
Go to the "App Registrations" service then Click "New Registration"
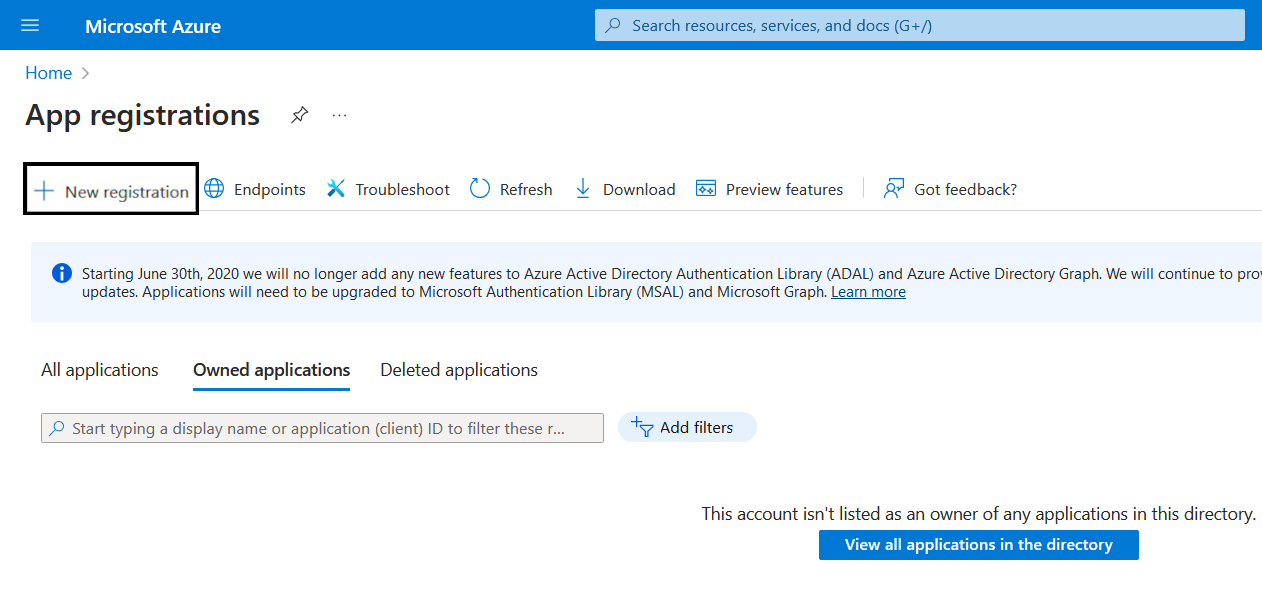 Enter a name e.g. "Passhub API", Leave the rest blank, Then "Register"
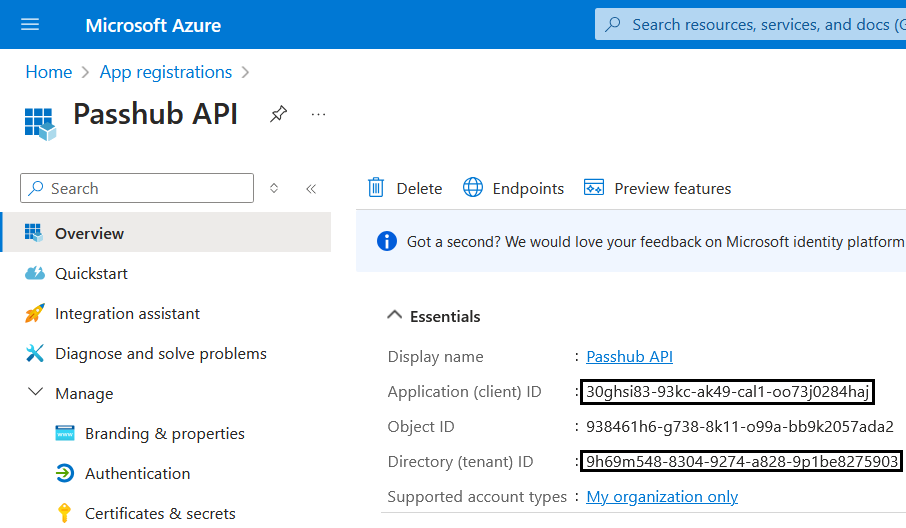
2. Copy Application IDs
Copy the Application Client ID and Directory Tenant ID and store it for Step 7
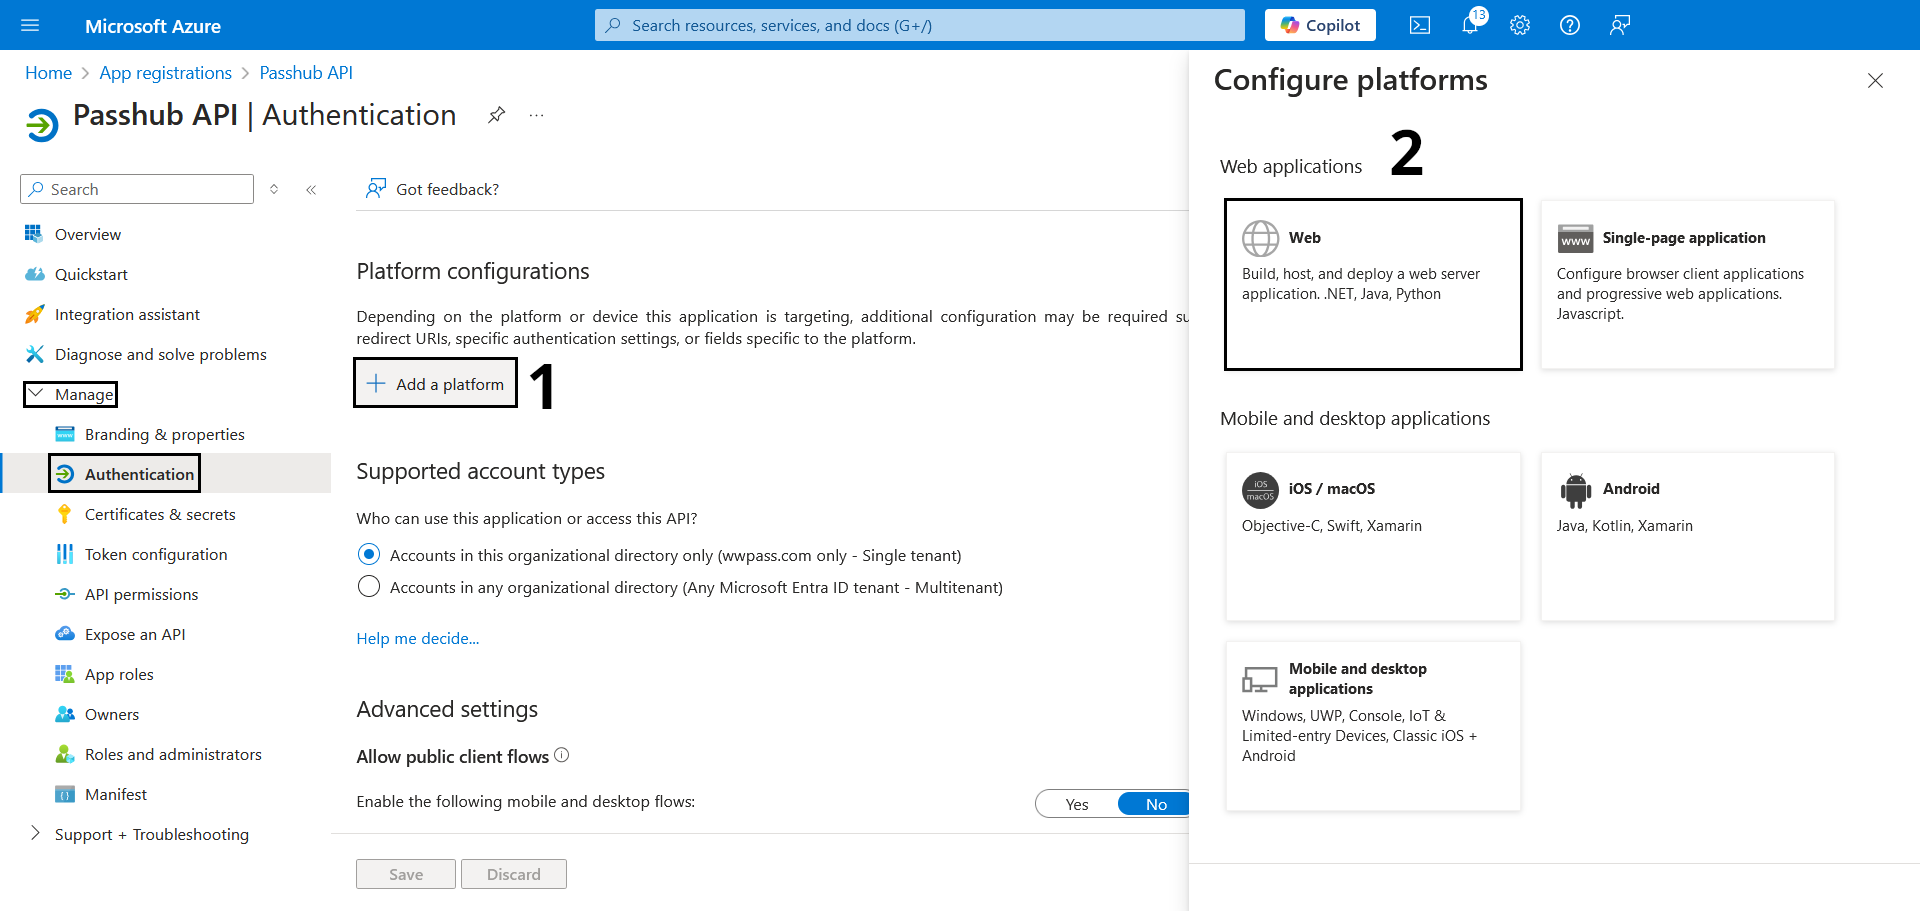
3. Authentication Of Users
Click "Manage" on the left, then "Authentication", at the top click the "Add a platform" button. then click "Web":
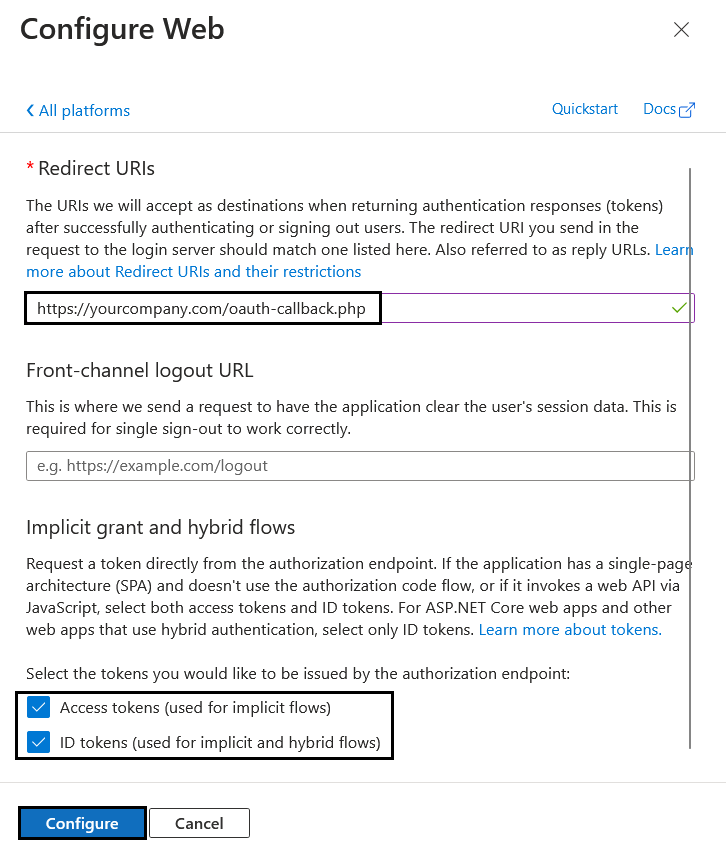
Make the redirect url https://yourdomain.com/oauth-callback.php and change yourdomain.com to your companies Passhub for Business website,
then select "Access tokens" And "ID Tokens",
Finally click configure.
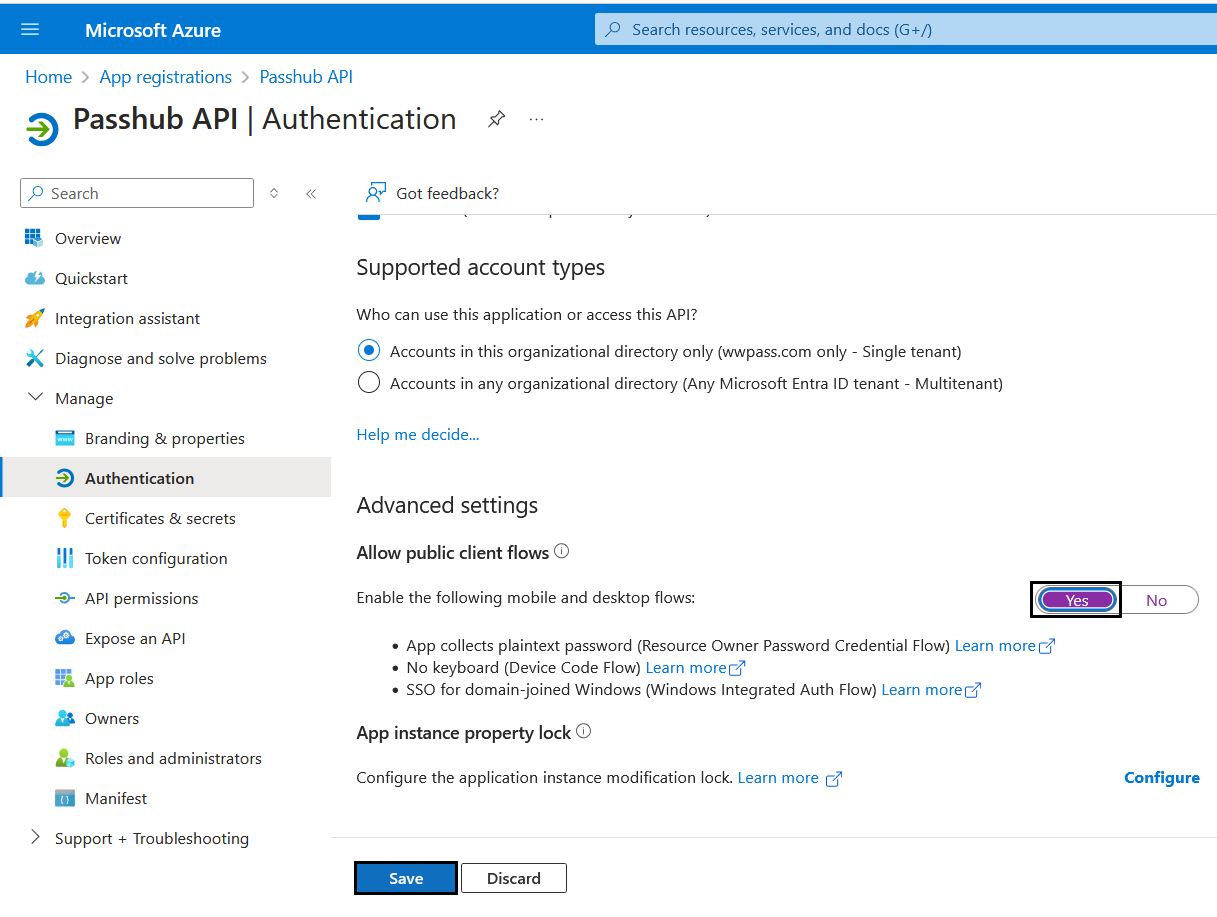
Scroll down to "Advanced Settings" then select Yes on the "Allow public client flows" and click save
4. Client Secret
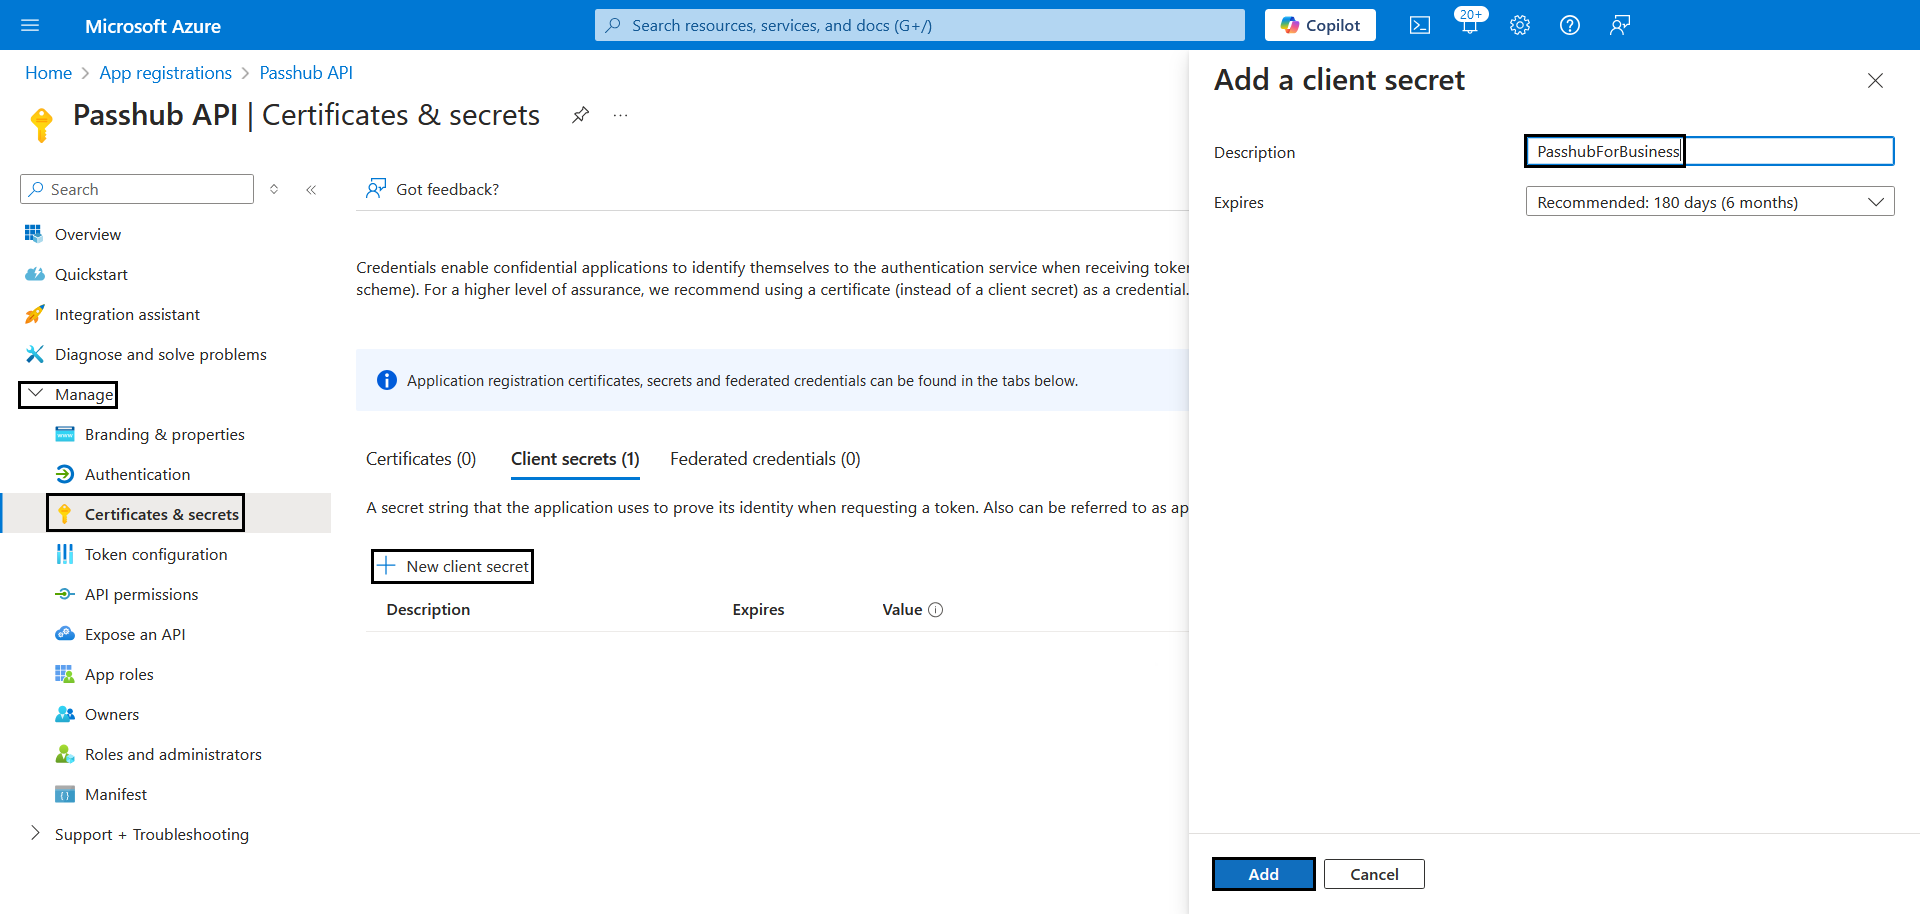
Under "Manage" go to "Certificates and Secrets", from there click on the "Client Secrets" tab, this is where you can create a "New client secret".
Give it a name such as "PasshubForBusiness", we suggest setting the expiration date for a year for more permanent passhub installations.
Once you are done click "Add", and finally copy the "Value" for the client secret and store it for later use in Step 7
5. Enable API Permissions
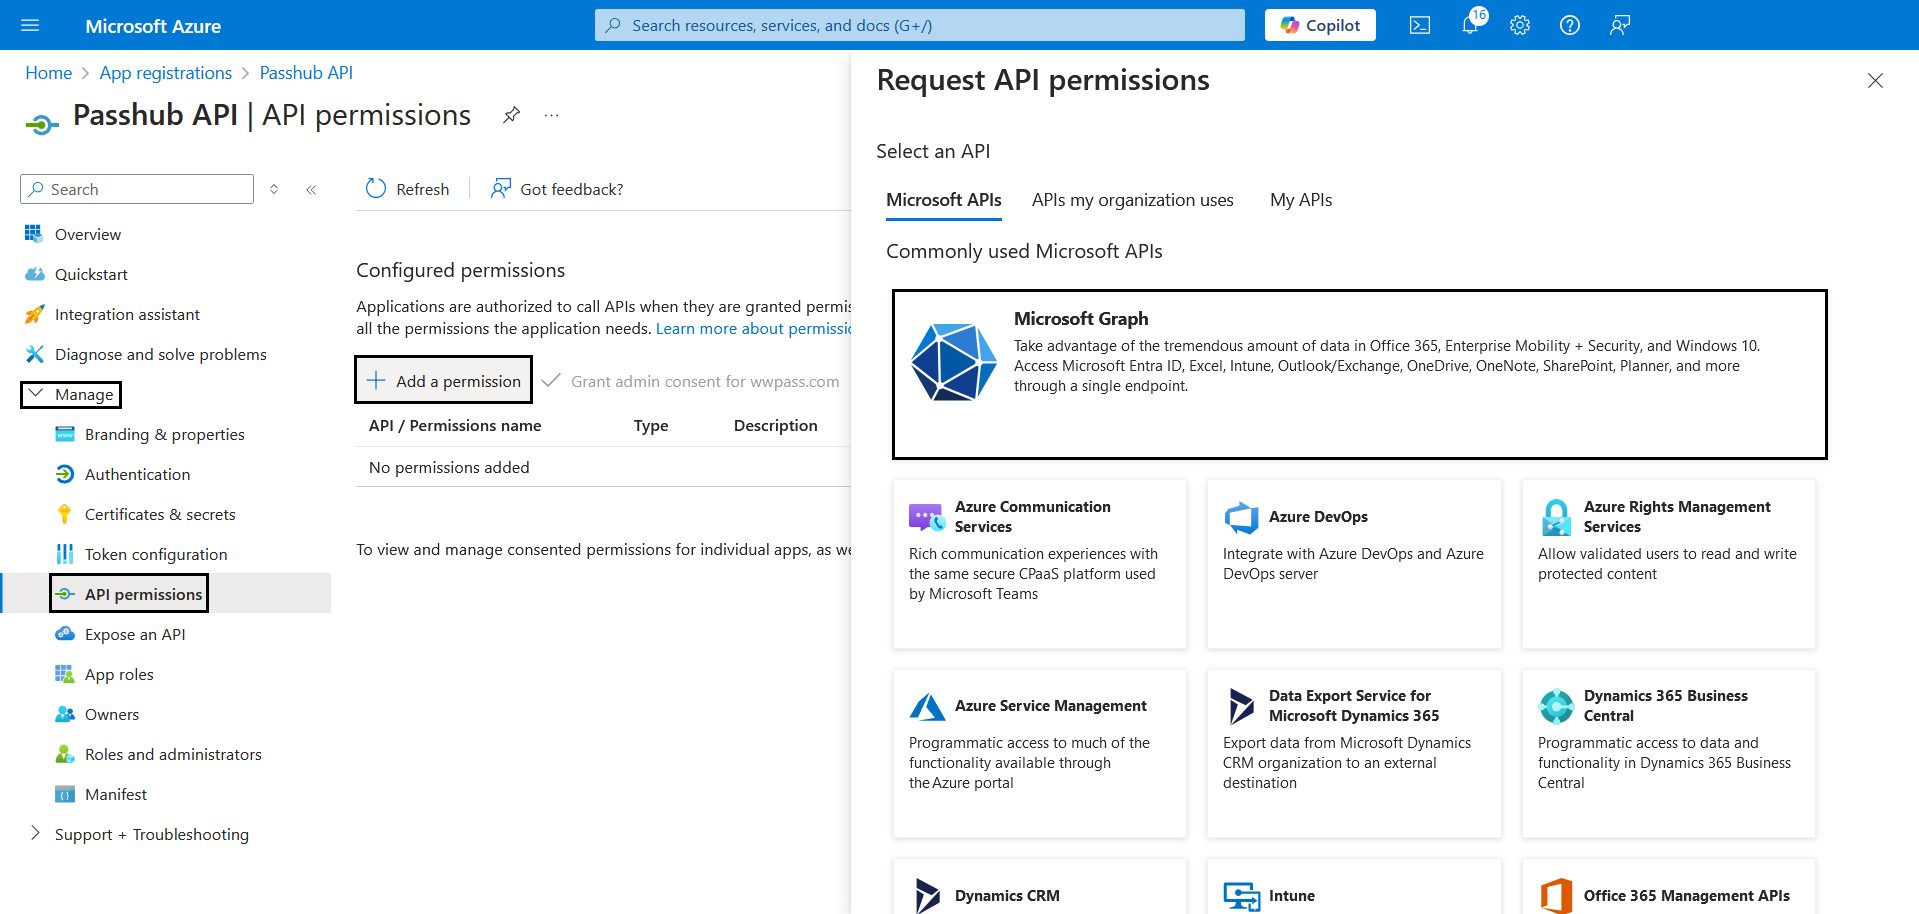
Under "Manage" go to "API permissions", from here we want to remove the default "User.Read" permission.
Now click "Add a permission" then click "Microsoft Graph"
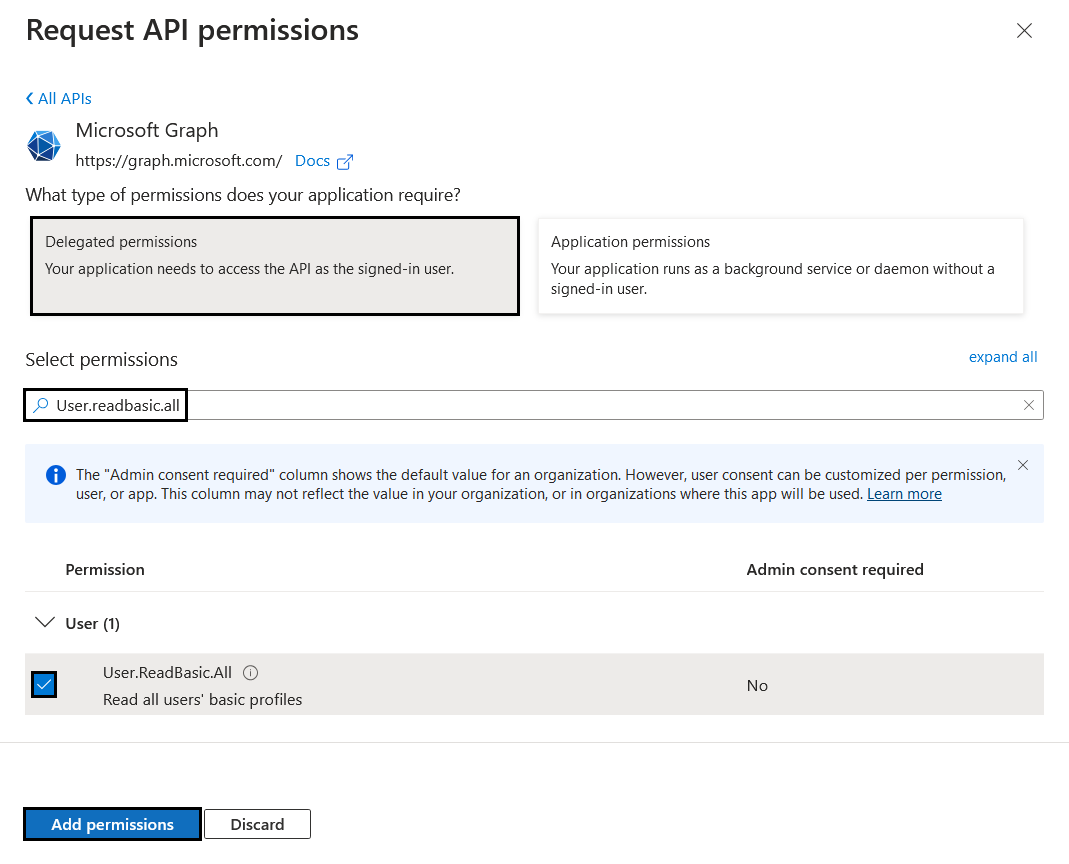
 Choose "Delegated permissions" and we will need 2 specifics ones: "GroupMember.Read.All" and "User.ReadBasic.All" and finally at the bottom click "Add permissions"
Note: Repeat this step again for Application permissions
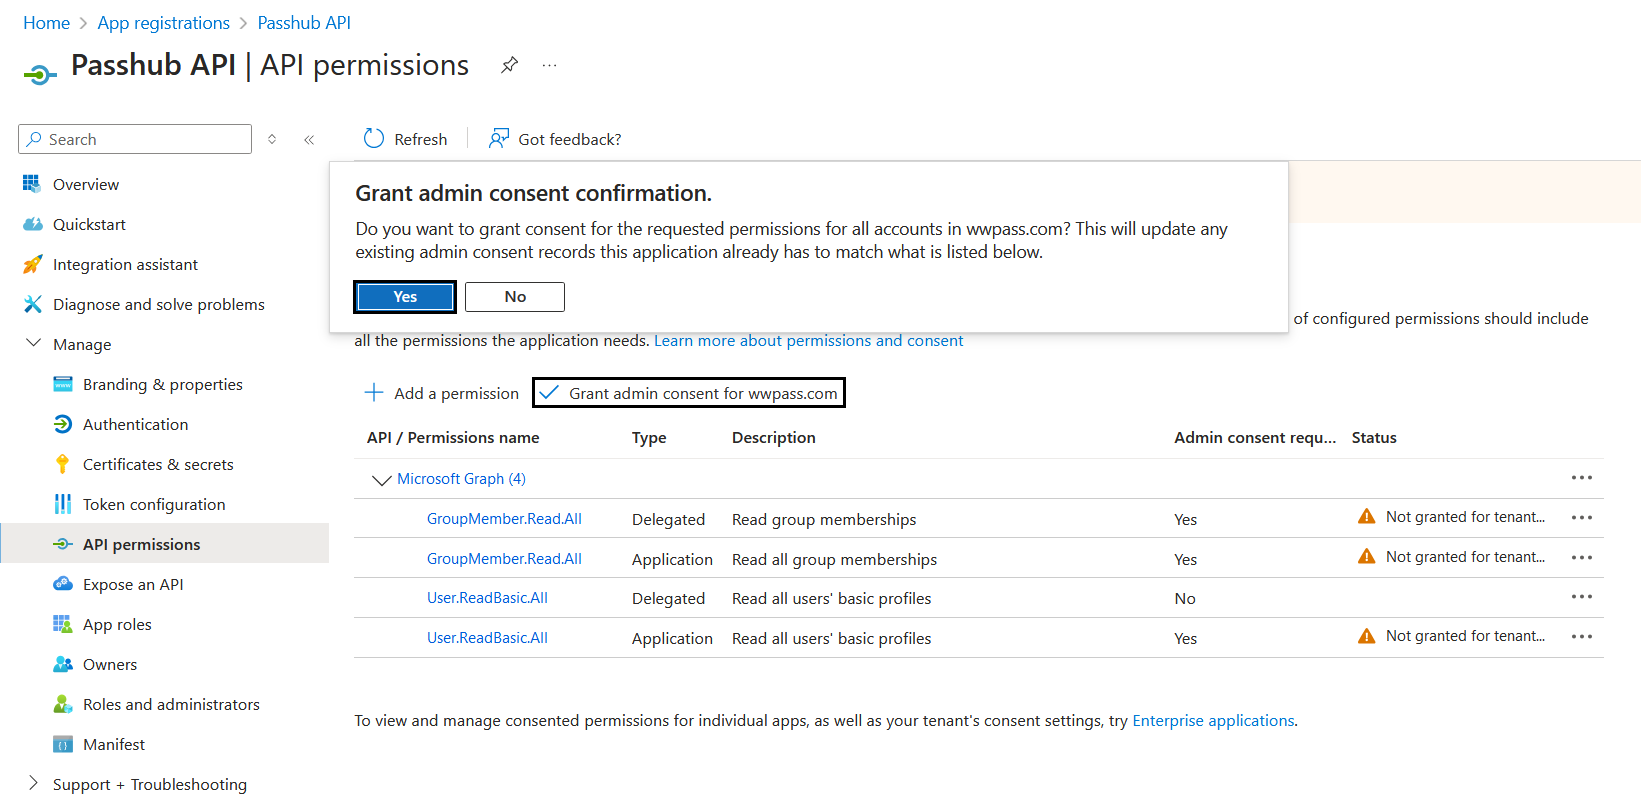
Now click on "Grant admin consent for yourdomain.com".
6. Change Configuration
In the Config.php file under the "AZURE" definition please put in the ids from step 2 and the Client Secret from step 4 into the config file. Also put in the names of your User and Admin Groups aswell. Here is the template below of the Config file for using Microsoft Graph:
define(
    'AZURE', [

    // App Registration ID's
    'application_client_id' => "XXXXXXXX-XXXX-XXXX-XXXX-XXXXXXXXXXXX",
    'directory_tenant_id' => "XXXXXXXX-XXXX-XXXX-XXXX-XXXXXXXXXXXX",

    // App Registration Client Secret
    'client_value' => "XXXXX~XXXXXXXXXXXXXXXXXXXXXXXXXXXXXXXXXX",

    // Name of Groups in Entra ID
    'user_group' => "PasshubUsers",
    'admin_group' => "PasshubAdmins",
    ]
);
Deploying PassHub with LDAP
You can deploy PassHub for Business to Azure and connect it with Azure Active Directory via LDAP.
-
Create an Azure subscription and Active Directory tenant. Azure Active Directory Domain Services managed domain should be enabled and configured. The following Microsoft tutorial guides through the details of Azure Active Directory Domain Services configuration: https://learn.microsoft.com/en-us/azure/active-directory-domain-services/tutorial-create-instance
-
Configure LDAP for an Azure Active Directory Domain Services managed domain. Please follow this Microsoft tutorial to complete the LDAP setup: https://learn.microsoft.com/en-us/azure/active-directory-domain-services/
-
Once the LDAP server is up and running, follow the above paragraph #connect-passhub-to-active-directory-ldap-azure to deploy PassHub for Business and perform PassHub configuration.
The parameters of the PassHub connection to Active Directory through LDAP is defined in the PassHub config file; (passhub/config/config.php), see the template below.
define(
    'LDAP', [
      // Active directory server schema, name and port
      'url' => 'ldaps://ad.yourcompany.com:636',

      'base_dn' => "OU=AADDC Users,DC=yourcompany,DC=com",

      // When creating a new user account,
      // Passhub identifies a user by the User Principal Name (upn),
      // which consists of a user name (logon name), separator (the @ symbol), and
      // a domain name (UPN suffix). In case the user provides only username, without
      // @-symbol and domain, the `domain` parameter is added to obtain the UPN

      'domain' => "yourcompany.com",

      // Group names, which allows to access PassHub and provides admin rights
      'group' => "CN=PassHubUsers,OU=AADDCUsers,DC=yourcompany,DC=com",
      'admin_group' => "CN=PassHubAdmins,OU=AADDCUsers,DC=yourcompany,DC=com",

      // credentials used by Passhub itself when cheking user membership to the above group
      'bind_dn' => "azureldap@yourcompany.com",
      'bind_pwd' => "12345678",
    ]
);